Clearance transfer / archive proof
Moving an existing NJ clearance to EverTeach
Where in the app: Onboarding → Background Check → Document Upload step, third card (only on the Archive or Transfer path). · Facts last reviewed 2026-09-05If you were already fingerprinted for a New Jersey school, you do not start over: you ask the Office of Student Protection to transfer (current clearance) or archive (older record) it to EverTeach. The proof is the confirmation page or email from that request. This card only appears when your Schedule Fingerprinting answers say you need it.
What we accept, what must be readable, what does not belong here
We accept
The OSP archive or transfer request confirmation page or email
The OSP approval showing your existing clearance now listed for EverTeach
A letter or email from your current or previous school or agency confirming you have worked for them continuously, with the start date (only needed on a transfer)
It must clearly show
Your full name
The words “Archive” or “Transfer” (or the request type)
EverTeach Solutions as the new employer
A date and a confirmation or reference number
Not this
A clearance letter that still names your previous employer only
A credential evaluation report or a certificate — those belong in other steps
A TB or health document
Don’t have it yet? On the OSP site choose Archive or Transfer request with EverTeach’s codes; the confirmation page is the proof. On a transfer, also ask your current or previous employer for a short letter confirming continuous employment and its start date — NJDOE expects us to hold it, and without it we cannot rely on your existing clearance.
Getting the document
1. Submit the request on the OSP site
Choose Archive Applicant Request or Transfer Request, enter EverTeach’s Student Protection and contributor case codes exactly as shown in the Schedule Fingerprinting step, and pay any fee.
2. Save the confirmation
Print the confirmation page to PDF or take a full-page screenshot. If OSP emails you, that email is fine too. It must show your name, the request type and EverTeach as the new employer.
What it looks like — examples
Illustrative example with made-up details — not a real document, not an official form. Real documents differ in layout; the numbered details are what must be readable.Example — OSP transfer / archive request confirmation
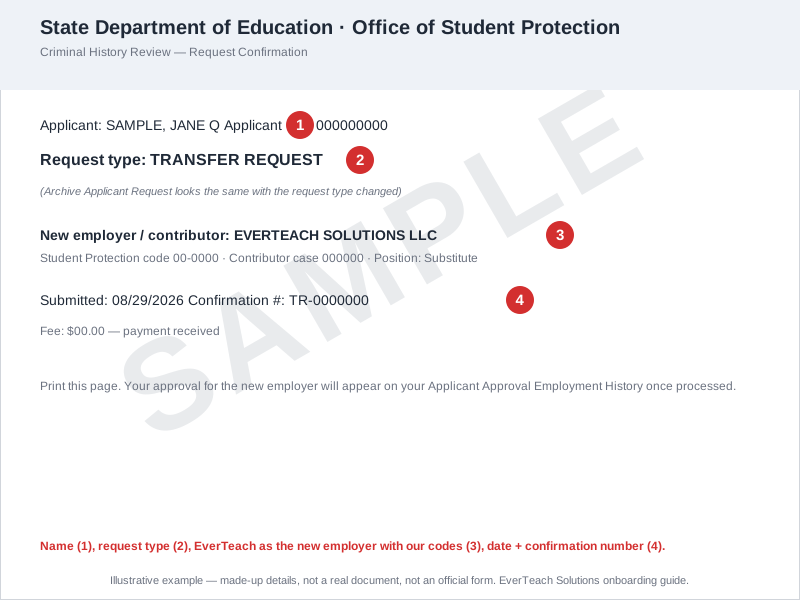
A confirmation page for a transfer request. The archive confirmation is similar.
- Your full name
- Request type — Transfer or Archive
- EverTeach Solutions as the new employer, with our codes
- Date and confirmation number
Uploading it in EverTeach
1. Open Background Check → Document Upload
Sign in, open Onboarding → Background Check, and go to the Document Upload step. In New Jersey the Schedule Fingerprinting step before it asks two quick questions that decide whether you need a new appointment, an archive request or a transfer — answer those first.
2. Read the card’s “What to upload & what we check”
Each of the three cards — Government ID, Background Check, Clearance transfer / archive proof — lists what we accept and what does not belong there. The transfer card only appears when your answers say you need it.
3. Upload the file
Click Upload Document and pick a PDF, JPG or PNG under 5 MB. For your government ID you can also type its issue and expiration dates — optional, but it saves our team reading them off the scan.
4. Check your upload in the review window
Your file opens next to the checklist for that card. Confirm every line, then click “Yes, this is my …” — or replace the file if it is the wrong one. This is the moment to catch a TB result or a certificate that ended up in the wrong step.
5. Submit for review
Once the required documents are uploaded the check goes to our team. A rejected document comes back on the same card with the reason and an “Upload again” button, plus an email and an in-app message.
Questions we hear often
I only have the clearance letter from my old employer.
That letter shows you were cleared for them, not for EverTeach. Submit the transfer or archive request and upload its confirmation here; the old letter can go in the Background Check card meanwhile.